Here’s a detailed step-by-step guide covering how to create an author website for beginners.
This is the continuation of an earlier post. You can read Do I Need an Author Website HERE.
In the earlier article, I shared the top 7 reasons why you should start an author website as soon as you decide to start writing.
Even if you’re not yet published, you can still have a basic website. Read more on that HERE.
Part 2 is the step-by-step guide for creating your author website so I suggest you read Do I Need an Author Website before this post.

This post contains affiliate links, which means I will receive a small commission if you purchase through those links. Read full disclosure HERE.
How to Create An Author Website – Step By Step Guide
Step 1 – Decide on Your Domain Name
Your domain name should be your pen name so it pops up when people search for you online.
If you want to be quirky with your name, you can do that on social media.
For instance, my handle on Twitter is different from my pen name but my profile name is still my pen name.

So, if your name is Terry Boye, your domain name should be terryboye.com.
If someone else has that name and terryboye.com is no longer available, you can play with the domain name.
It could be terryboyeiswriting.com, terryboyefiction.com, or terryboyeauthor.com.
Whichever variation you choose, your pen name should be in there. Do not use a book name or series name as your domain name.
Step 2- Create a Logo and Brand
Create a logo. I created my website logo with a tagline on Canva within half an hour. My branding colors are my favorite colors.
Develop something that is uniquely you. You can find loads of templates you can adapt according to your taste on Canva.
This website’s logo was created and finalized with Canva and I’m happy with it because I wanted something simple.
If you’re not comfortable creating logos, you can hire someone to do it for you on Fiverr for less than $10. Check out Fiverr options at Fiverr Graphics & Designs.
Step 3 – Buy Your Domain Name
Once you’ve decided on your domain name, the next thing to do is buy it.
I recommend Namecheap for purchasing your domain name. I’ve shared the process for Namecheap below:-
Buy a Domain Name on Namecheap
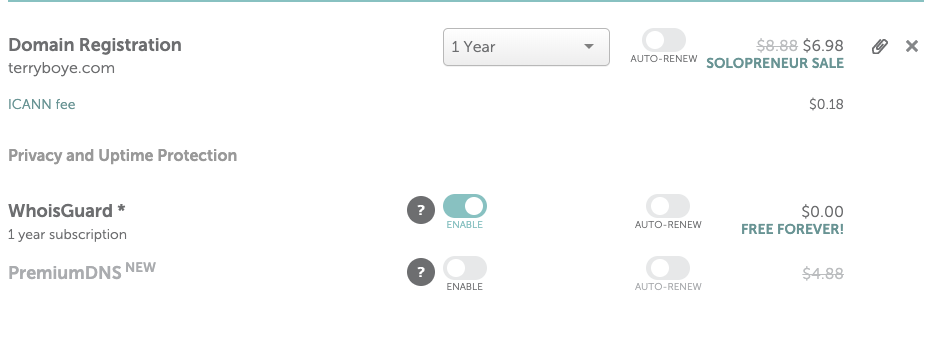
Go over to Namecheap HERE and type in your chosen domain name into the search button.

In this case, I use terryboye.com. It shows the domain name is available and is $6.98/year.

There is no need to buy other variations of the domain such as .ca, .net, .org, etc.
Add it to your cart and checkout. Your domain name also includes free WhoisGuard protection.
WhoisGuard protects your privacy in the public domain to prevent spam. Your domain name is valid for a one-year minimum or you can buy multiple years for a discount.
Confirm your order and you will be prompted to create an account.
Go ahead and do this as you will be managing your domain and WhoisGuard information via your account as long as the domain name is available.
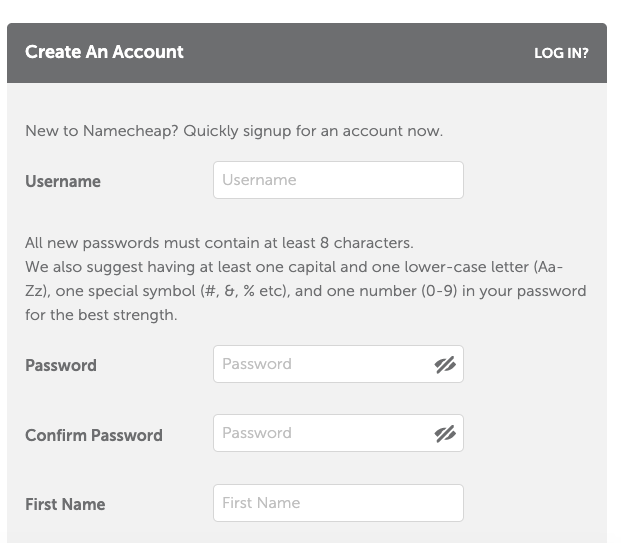
Once your account is created, you can pay with your credit card or via Paypal. Voila, you have a domain name!
It costs less than $10 every year for a domain name and it’s well worth the investment in your writing career.
Step 4 – Sign Up for Web Hosting

Web hosting is your domain name’s house. It’s where your website will be; the framework you build your website on.
You don’t have to get too fancy with web hosting especially if you’re a new writer.
You can buy your hosting with Namecheap at the same time you buy your domain name or you can purchase hosting through Siteground.
The more years you pay for, the cheaper your hosting package will be.
Once you’ve purchased your hosting package, you can then set up the foundation of your website.
The links below show how to set up your account once you’ve purchased your hosting package with either Namecheap or Siteground.
They will send you an email with all the information you need.
- How to Set Up Your Hosting Account With Siteground
- How to Set Up Your Hosting Account With Namecheap
Step 5 – Build Your Website
Don’t panic. No techno-jargon coming your way. Building your website involves the design, pop-ups, menu, look and feel, and other customizations.
This requires a WordPress theme. Free themes are available when you install WordPress after you set up your hosting account.
However, customizations are limited with free themes and you may not be able to do much with it.
Nevertheless, you can start with the free versions of my recommendations below and then proceed to the paid version later on.
- Genesis Framework – my business websites are built on the Genesis Framework. You can get Genesis Framework HERE. Genesis Framework comes with several free themes. You can also check out their child themes here.
- Generate Press – My website is built on GeneratePress. You can download a free GeneratePress theme HERE.
Which one is best? If you’re new to all this, start with GeneratePress.
If you want to get all fancy with bells and whistles, start with Genesis Framework.
Either way, you can switch themes later on so don’t feel like you’re stuck with one over the other.
Each of these recommendations has a one-click install option for websites so all you have to do is customize with text and images afterward.
Below are demo videos for both options for you to get an idea of what’s involved:-
Genesis Framework Demo
You can view a Genesis Framework demo HERE.
Generate Press Demo Video
What Should Be On Your Author Website?
Now that you’ve bought a domain name, created a logo, and installed WordPress, the content on your author website is equally important.
You can add anything you want but the below elements are mandatory for any author website:-
- About/biography page with a headshot
- WIP page
- Published works page with reviews
- Blog page
- Email opt-in page
- Contact page
- Privacy policy page
- Disclosure page
- Social media links
You can add other elements if you like but those mentioned above have to be on any author website.
Visit other author websites to check out the pages they have and use that as inspiration for your website.
You can also check out mine to see my structure.

Step 6 – Start Building Your Mailing List
You should start building your mailing list from the first day you launch your website.
Your sign-up form should be at the top and bottom of blog posts, in your sidebar, and as a pop-up.
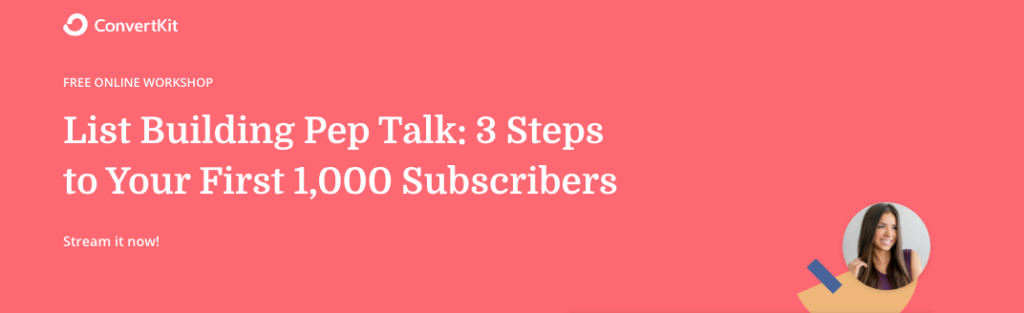
I will write a more in-depth post later on about setting up your mailing list. In the meantime, I recommend MailerLite and ConvertKit for your mailing list.
They both have free and trial options before you sign up for a paid account.
You can also sign up for a free webinar on getting your first 1,000 subscribers HERE.
Step 7 – Install Important Plugins
Plugins increase your website’s functionality and allow you to customize it without modifying any code.
WordPress has thousands of plugins, but the most important ones you should have on a new website include:-
- All in One SEO – A tool that optimizes your website so that search engines like Google and Bing can find you.
- Akismet Anti-Spam – Protects your website from being bogged down by thousands of spam comments.
- Cookie Notice – You must notify visitors that your site uses cookies in compliance with EU cookie laws and CCPA regulations. This plug-in takes care of that with customized text already provided.
- FMTC Affiliate Disclosure – If you’re going to be joining any writing affiliated programs to sell them on your website, you must include an affiliate disclosure. You can see mine at the top of this article.
- Grow by Mediavine – Adds social sharing buttons to your posts, pages, and custom post types.
- WP Super Cache – If you go with Siteground Hosting, you don’t need a separate cache plug-in as they have their own plug-in for that. A caching plug-in speeds up access to your website when people visit.
- Wordfence Security – Guards your website against malware, unauthorized log-ins, and other threats. It also notifies you when there’s an issue with any plug-ins.
All these plug-ins can be downloaded directly from your website dashboard once you’ve set up your website hosting.
Most Important Things to Remember About Your Author Website
- You won’t get it right from scratch. Don’t try to make it perfect before going live. You will have to customize and tweak as you go.
- Develop a branding that’s all you. Looking at my website, you can see my colors are green and navy blue, I have a logo with a tag line as well as common fonts.
- Do not turn your author website into a coloring project. Three colors maximum with a clean design that’s easy to navigate. Don’t make people work to find information.
- Do not use a book or series name as your domain name. A writing career is fluid and it will be hard to scale later on if you’ve committed yourself to a domain name with 1 book title.
- Use powerful engaging images when you create content. You can find free images at unsplash.com and pixabay.com but for unique images, have a look at Canva Pro.
I’ve created a handy checklist with everything you need to do with this article. Download it for free along with other goodies HERE.
Confused? Got a question or two? Ask in the comments section below.
The next article will share how to build an audience with your author website. Stay tuned.
You can join the mailing list below so you’re notified when the post is live. You’ll also receive free motivational and inspirational writer printables.
Wunmi inherited every sarcastic bone in her parents’ bodies and channels that genetic feistiness into her stories. When she’s not reading and writing, she’s plotting her next travel adventure. Her writing has appeared on HuffPost, YouQueen, Medium, and several anthologies. She is currently working on several full-length novels. Learn more about Wunmi here…
1 thought on “How to Create An Author Website – A Step By Step Guide”